How to Use Google Images to Spot Misinformation: A Step-by-Step Guide
Here's a step-by-step guide to using Google Images to spot misinformation and protect yourself from misleading content.
ARTICLES
10/21/20242 min read
In the digital age, misinformation spreads quickly, often taking advantage of images to manipulate emotions and perceptions. One effective tool to combat this is Google Images' reverse image search. It helps verify the authenticity of images by tracing their origins and finding similar visuals online. Here's a step-by-step guide to using Google Images to spot misinformation and protect yourself from misleading content.
Step 1: Save or Screenshot the Image
To start the verification process, save the suspicious image you want to investigate on your device. You can right-click on the image and select "Save image as..." to download it, or take a screenshot.
Step 2: Access Google Images
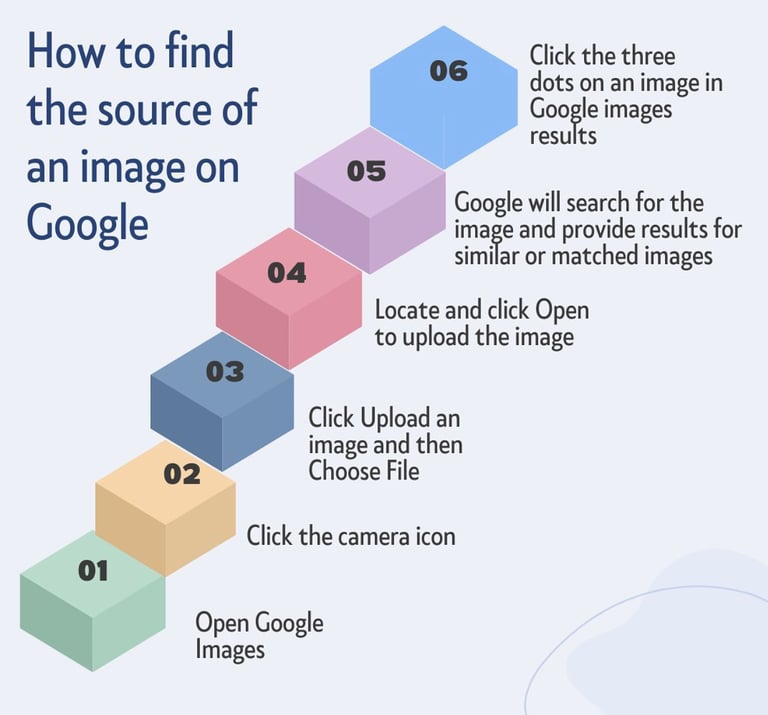
Open your web browser and navigate to Google Images. This platform allows you to search for images by uploading them, using image URLs, or by simply dragging and dropping.
Step 3: Upload or Drag and Drop the Image
On the Google Images search bar, you’ll notice a camera icon. Click on the camera icon to open the reverse image search feature.
You’ll have two options:
Upload the image: Click on “Upload an image” and select the saved image from your device.
Drag and drop: Simply drag the image from your computer and drop it into the search bar.
Step 4: Use the Image URL (Optional)
If you don’t have the image saved, but it’s from a website, you can use the image’s URL:
Right-click the image and choose “Copy image address.”
Go to Google Images, click the camera icon, and paste the copied link under “Paste image URL.”
Step 5: Review the Search Results
Once you’ve uploaded or linked the image, Google will show you a series of visually similar images along with webpages that contain those images. Carefully examine the results to spot the following:
Original Source: Scroll through the search results to find where the image first appeared. Look for reliable sources such as news outlets, official websites, or academic platforms.
Date of First Appearance: Check when the image was first published. If the image claims to be recent but first appeared years ago, that could indicate that it has been repurposed to deceive.
Context of Use: Verify whether the image was used in different contexts. Misinformation campaigns often take images out of their original context, using them to support unrelated claims.
Step 6: Check for Alterations
Images used in misinformation can be edited or altered. Look closely at the search results for variations of the image. Pay attention to image modifications like adding misleading text, changing elements in the photo, or cropping the image to omit key details. Cross-reference the image with other trusted sources to ensure it hasn't been manipulated.
Step 7: Cross-Check with Fact-Checking Websites
Fact-checking websites like Snopes, FactCheck.org, and Reuters Fact Check often analyze viral images and provide accurate information. If the image has been used in a popular misinformation campaign, these sites may have already debunked it. Include these platforms in your research to strengthen your findings.
Step 8: Verify Related Information
In some cases, spotting image misinformation goes beyond visual content. Investigate the accompanying text or caption that may be attached to the image. Misinformation often pairs an accurate image with false claims. A reverse image search can help confirm whether the accompanying story aligns with the image's context.
Step 9: Share Verified Information
Once you've verified the image, use the accurate information to correct the misinformation. You can share your findings with others who might have been exposed to the false image, promoting truth and preventing further spread.


